
Your name. Your inbox. Very little fuss. Let’s get you settled in.
Bring a domain you already own, or pick an available name at @veryeasymail.com. The inbox works the same way; the getting-started route is a little different. Use On this page to jump to the bit you need, or save this guide as a PDF through your browser’s Print menu.
Already have an inbox? Open webmail, jump to Very Easy Sign-In, or grab the email-app settings.
Pick your address. We’ll bring the inbox.
| Your choice | An example address | Annual price | What you need to set up |
|---|---|---|---|
| Use a domain I own | hello@yourbusiness.com |
US$20 | Prove you control your domain, then add its mail settings |
| Choose an @veryeasymail.com address | yourname@veryeasymail.com |
US$32 total | Choose an available name and confirm your existing contact email; we handle the domain settings |
The @veryeasymail.com option adds US$12 a year to the Mail plan: the equivalent of US$1 a month, billed annually. Both choices include up to ten separate inboxes and 1 GB shared storage. The extra charge supplies the address domain; it does not add another ten inboxes or another gigabyte.
Prices are based on US dollars. Check the currency and final total shown at payment; a converted amount can change with exchange rates. Any monthly equivalent here explains an annual price, rather than a monthly subscription.
With your own domain, the name stays yours and you can take it to another mail provider. With @veryeasymail.com, we own and maintain the domain. You can export your messages, contacts and calendars, but you cannot transfer that email address to a different provider.
The very short version
Bringing your own domain?
- Open Very Easy Mail setup and choose Use a domain I own.
- Enter your domain and an existing contact email. Add the ownership TXT record shown, verify it and complete checkout.
- Return to setup, create your inboxes under Your inbox crew, then add the displayed mail DNS records. Prepare an existing mail move before switching its MX record.
- Open webmail, sign in, send a hello and test a reply.
Want an @veryeasymail.com address?
- Open Very Easy Mail setup and choose Choose an @veryeasymail.com address.
- Pick an available email name, confirm the code sent to your existing email and complete the US$32 annual checkout.
- Return to your account and create the inbox with its password. Choosing a name reserves the address; creating the inbox makes it usable.
- Open webmail, send a hello and test a reply. No DNS records to add.
Prefer mail on your phone or computer? The same app settings work for both choices. That’s the route; the rest of this guide is your friendly passenger, with the map.
Before you begin
Have these ready:
- For your own domain: its name, such as
example.com, and access to its DNS settings. These may be with your registrar or Cloudflare. - For @veryeasymail.com: a name you would like before the @. Have a second choice ready in case someone already has your favourite.
- An existing contact email outside the domain you are setting up; for the shared-domain option, it must be outside veryeasymail.com. This keeps billing and service messages reachable if your hosted email has a problem.
- A password manager, or another safe way to keep separate mailbox passwords.
Each annual account covers up to ten separate inboxes and 1 GB of shared storage on your selected domain option. Each inbox has its own address and password. The storage belongs to the whole crew: giving someone a new inbox does not add another gigabyte.
A domain is the bit after the @. A mailbox is the inbox belonging to one complete address. DNS is the internet’s address book: a few records tell other systems where your domain’s email belongs. You will copy records from your setup page rather than invent them.
Moving existing email? Start here
Changing an MX record changes where new email arrives. It does not bring your old messages with it.
Before you change mail routing:
- List the addresses people currently use, including addresses printed on your website or stationery.
- Create the matching inboxes in Very Easy Mail. Check that your current setup fits the plan; aliases, forwarding arrangements and multiple domains should not be assumed to transfer automatically.
- Export or back up old messages, contacts and calendars. Check that the exported files open.
- Keep the old service accessible while you copy what you need and check the new service.
- Change the mail-routing records only when the new inboxes are ready. Check both services during the changeover because cached DNS can send mail to the old destination for a while.
If another service still sends mail for your domain, keep its authorised sending details when updating SPF. Your website’s contact form may count too. A mail move should not accidentally unplug the website’s postman.
Bring your own domain
Open Very Easy Mail setup and choose Use a domain I own.
- Enter the domain without
https://, a path or an email address:example.com. - Enter your existing external contact email.
- Complete the quick security check and choose Start my email setup.
- Open the DNS settings for that domain and add a TXT record using the exact Name and Value shown on the setup page. Leave the provider’s default TTL unless you have a reason to change it.
- Save it, return to setup and choose Check my domain and continue to payment.
- Check the plan and price in checkout, complete payment, then return to the setup page.
DNS providers label the name field differently: Name, Host or Record name are common. Some automatically add example.com at the end. Avoid entering it twice. Copy the value as shown; do not add your own quotation marks unless your provider specifically requires them.
The ownership TXT record proves control of the domain. It is separate from the MX record that routes incoming mail.
Paid, but the page still looks busy?
Choose Check order status. If checkout was interrupted before payment completed, use Continue payment. Do not start another purchase just because you closed the first tab.
Account creation runs in the background. If the status does not progress, keep your receipt reference and contact support with the domain and approximate payment time. Never send card details.
No domain? Choose @veryeasymail.com
No domain shopping. No DNS treasure hunt. We look after that part.
- Open Mail setup and select Choose an @veryeasymail.com address.
- Under **Your email name — the part before @**, enter a name such as
sam.example. The form adds @veryeasymail.com for you. - Use 3–40 lower-case letters, numbers, dots, dashes or underscores. Start and finish with a letter or number; skip spaces and consecutive dots. Some service names are reserved.
- Enter an existing contact email you already receive mail at, outside veryeasymail.com. Keep it working: confirmation, renewal and account-recovery messages go there.
- Complete the security check and choose Check my name and send a code. If the name is taken, try another. A display name does not reserve an email address.
- Check that existing inbox, including Junk. Enter the six-digit code within 15 minutes and choose Confirm my email.
- Choose Continue to payment — US$32/year, check the address and annual total, and complete checkout.
- Return to your account. Choose Check my account if needed, then create your first inbox under Your inbox crew. Set its password and save it safely.
- Open webmail with the full address. Send a message to another email address you use, then reply to check both directions.
We already maintain MX, SPF, DKIM and DMARC for veryeasymail.com. You do not add those records yourself and you do not need access to our Cloudflare account.
More inboxes, same tidy plan
Your ten-inbox allowance belongs to your account. Additional @veryeasymail.com names must each be available; you do not control every address on the shared domain. Once an address has been activated, it is retired when deleted rather than given to another customer. Choose names you will be happy to print on a business card.
Want to use your own domain later? Export what you need and arrange the new service before leaving the old one. A new domain is a different email address; messages sent to the old address do not magically follow it.
Three doors, three different jobs
| Where you go | What you do there | What gives you access |
|---|---|---|
| Mail setup and management | Create inboxes, change their settings and open billing | Your customer-management session; use the recovery route for your chosen address option |
| Very Easy Mail webmail | Read and send messages | The full mailbox address and its password, or Very Easy Sign-In after that mailbox is connected |
| Stripe billing, opened from Manage billing and renewal | View invoices, update payment details and manage renewal | The secure billing session opened from your customer account |
Your mailbox password is not your Google password, and paying through Stripe does not create a password for your inbox. The person managing the service creates each mailbox password separately.
Customer email works over a normal internet connection. You do not need a VPN. Links intended for server administrators are not the customer login route.
On your own trusted device, Remember this device can retain your management access. Leave it unticked on a shared computer. Sign out on this device clears access on that device; it is not a button for signing every other device out.
One familiar login: Very Easy Sign-In
Very Easy Sign-In is part of Very Easy Web Hosting. It lets you use a connected identity across participating services, including Google if you have already linked Google to that identity.
On Very Easy Mail, choose Continue with Very Easy Sign-In and complete the central sign-in. If asked, use your usual authenticator check. The sign-in opens the mailbox explicitly connected to that identity.
Your Google address may be different from your Mail address. We do not guess that two accounts belong together just because a name or email looks familiar. Signing in does not buy a subscription, create a free inbox or grant administrator access.
If your mailbox is not connected yet, use its normal full-address-and-password login. Do not create another paid service to fix a sign-in problem.
Connect an existing inbox
Keep your mailbox open while you do this. We check both sides of the connection so the right person gets the right inbox.
- Sign in to Very Easy Mail with the full mailbox address and its current mailbox password.
- Open Connect this mailbox. Check the email address shown before continuing.
- Open Connect with Very Easy Sign-In. Choose the identity you want to use for this inbox and complete any usual authenticator check. You go straight to the mailbox connection; there is no separate account dashboard to find.
- Check the mailbox address and approve its basic-profile connection. This links the account; it does not let the sign-in service read your messages.
- Return to the mailbox connection page and choose Finish connecting this mailbox. Check the mailbox and identity shown in the final confirmation, then choose Connect this mailbox.
- Use Continue with Very Easy Sign-In for webmail from now on. For a phone or desktop mail app, create an app password as explained below.
If the confirmation names another inbox, stop and choose the correct identity. Connecting a staff member’s inbox to your own personal Google account is a shortcut you will both regret.
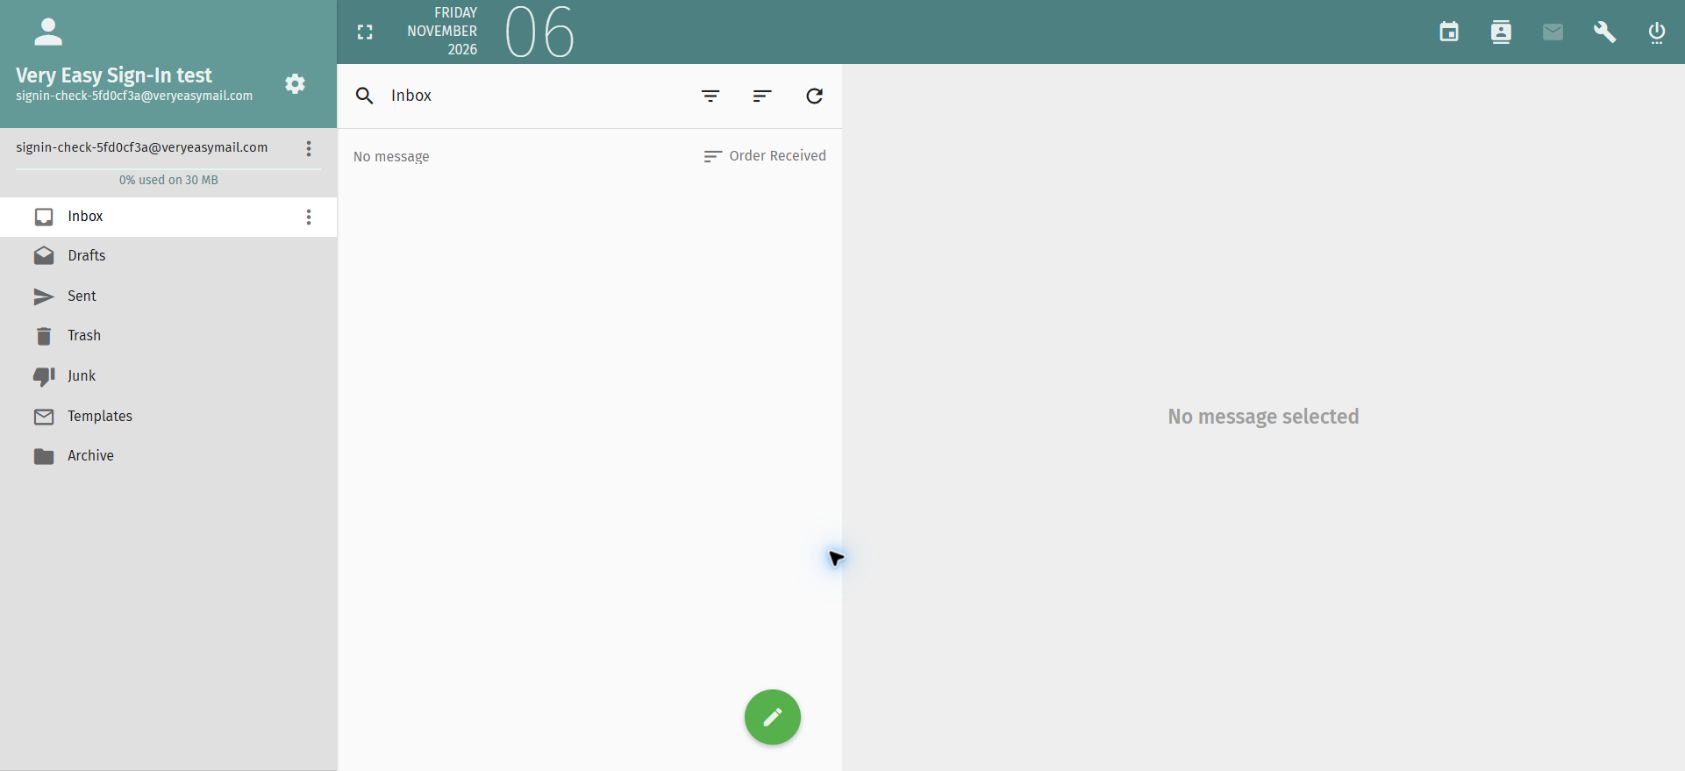
Your own address and storage allowance appear in the left-hand panel. The pencil button starts a new message.
The phone-app bit
For a mailbox connected to Very Easy Sign-In, open its Mailbox Settings, then App Passwords. Generate an app password for your mail app and save it securely. Use that app password with the IMAP/SMTP settings below. Your Google password and your Very Easy Sign-In password are not IMAP or SMTP passwords.
Keep separate app passwords for separate devices where practical. If one device is lost, revoke its app password without changing the others. Do not send an app password to support.
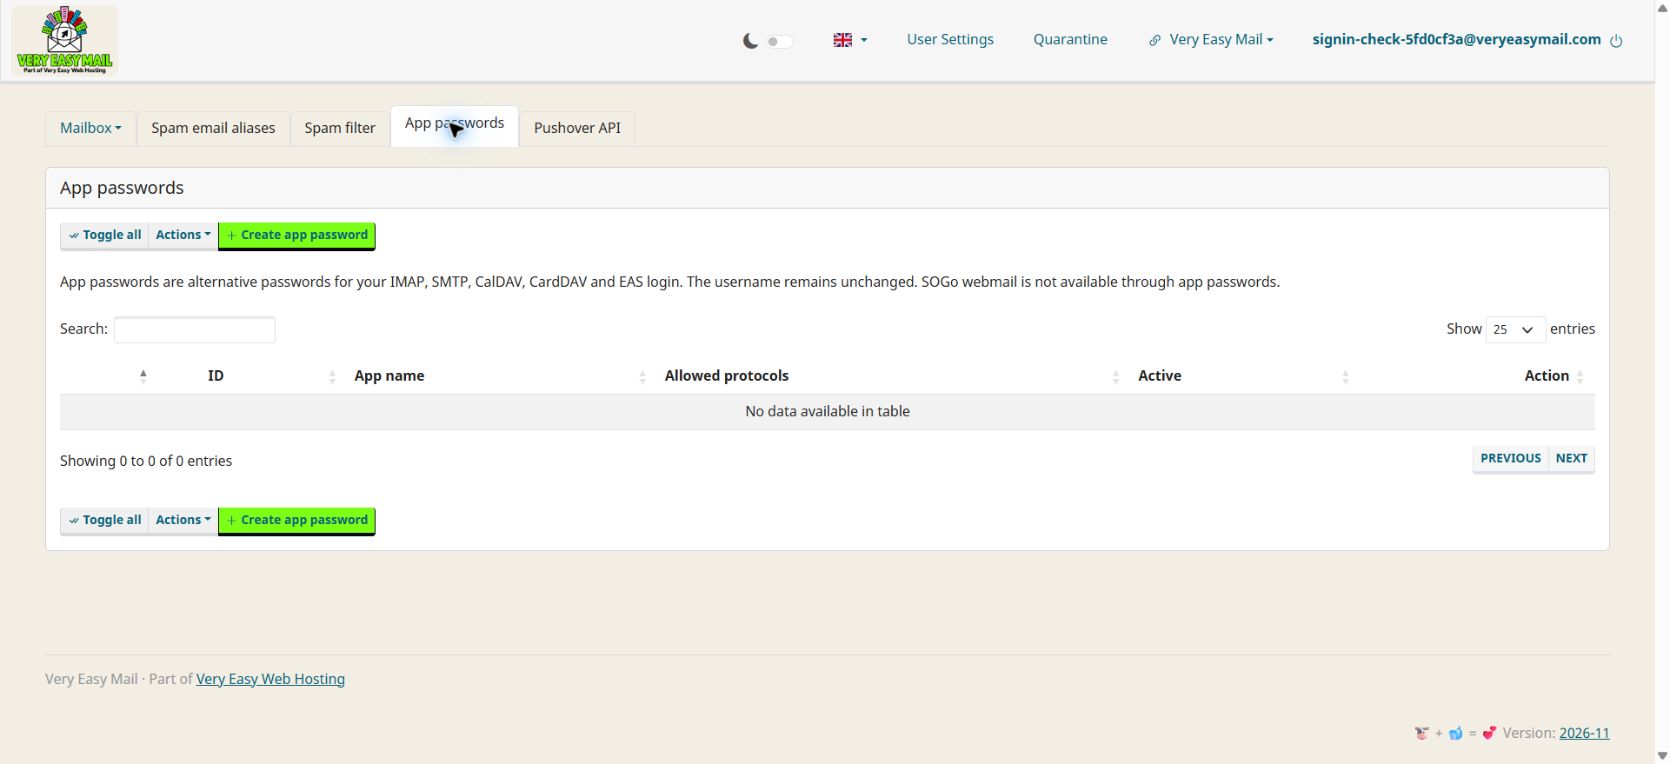
Choose Create app password, give it a name you recognise, such as “My phone”, and enable only the protocols that app needs. Ordinary email apps use IMAP and SMTP. Use the generated password in the app; keep your full mailbox address as its username.
Sign out properly
Sign out of webmail when you finish on a shared computer. Very Easy Sign-In can have its own separate session: use its sign-out too if you do not want the next sign-in to reuse that session. Signing out of one tab does not by itself disconnect every phone and desktop app.
Meet your inbox crew
In the management page, find Your inbox crew, then Create or manage a mailbox.
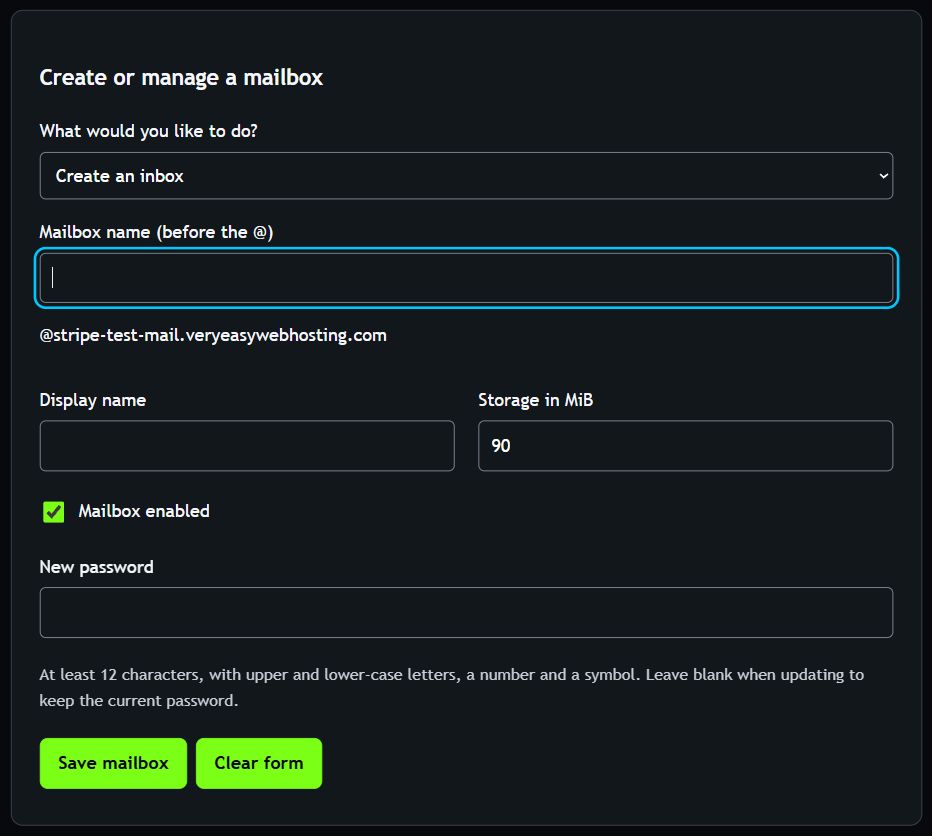
- Under What would you like to do?, choose Create an inbox.
- Enter Mailbox name (before the @). For
hello@example.com, enterhello. - Add a Display name, such as
Sam at Example. This is the friendly name people see; it does not change the email address. - Set Storage in MiB. The storage section explains how to divide the shared space.
- Leave Mailbox enabled selected.
- Enter a New password of 12–128 characters, including upper- and lower-case letters, a number and a symbol. Use a unique password and save it safely.
- Choose Save mailbox and wait for the result. Use Refresh mailbox list if the list has not caught up yet.
Use lower-case letters, numbers, dots, underscores or hyphens for the mailbox name, starting with a letter or number. Avoid spaces and consecutive dots. For @veryeasymail.com, use 3–40 characters and an available name allocated to your account. The form checks the name for you.
Creating hello@ does not also create sales@. Each address needs its own inbox within your ten-inbox allowance.
Give someone their inbox
They need the full email address, its password, the webmail link and, if using an app, the server settings below. Share the password through a secure method rather than putting it into a public chat or a support ticket. Do not share your service-management access just so someone can read their own mail.
Tell the internet where your mail lives
Using @veryeasymail.com? Skip this section. We maintain its DNS for you.
Use the exact DNS instructions displayed for your own domain after setup. Records from another customer’s account will not do.
| Record | What it does | What to watch for |
|---|---|---|
| MX | Directs incoming messages to your mail service | Create the inboxes before switching from an existing provider |
| SPF, stored as TXT | Lists the systems allowed to send for your domain | Keep one SPF record and include any other legitimate senders |
| DKIM, stored as TXT | Publishes a key that lets recipients check your signed mail | Copy your own selector, name and public value exactly |
| DMARC, stored as TXT | Gives recipients a policy for mail that fails the domain checks | Reconcile an existing policy; do not overwrite it blindly |
Do not remove unrelated website, verification or other TXT records. If SPF already exists, update that single record to include all authorised senders rather than adding a second SPF record. If you are unsure how two services’ settings fit together, ask before switching routing.
For DKIM, a record name often contains ._domainkey. Make sure your DNS provider has not appended the domain twice. Long TXT values sometimes display in several quoted chunks; follow your provider’s method for saving one complete value.
DNS caches take time to catch up. Repeatedly deleting and recreating the same correct records usually adds confusion. Check the saved names and values first, then allow the previous TTL to expire.
Once the records are in place, send a message to an outside address and reply from that address. Testing both directions catches more than sending a message to yourself.
Open webmail and send your first hello
Go to mail.veryeasywebhosting.com. Use your complete email address, such as hello@example.com, and the password created for that inbox. If the mailbox account page appears first, open its webmail option. A connected mailbox can also use Continue with Very Easy Sign-In; see the sign-in section.
Compose a short message to an email address you already use. Check the From address, add a subject and send it. At the other address, check Inbox and Spam, then reply. Back in Very Easy Mail, refresh your inbox and open the reply.
For everyday use:
- Reply answers the sender; Reply all also includes the other recipients. Give that second one a quick glance before clicking.
- Cc visibly copies other people. Bcc hides those addresses from the other recipients.
- Use the attachment control to add a file, then wait for the upload before sending. Large files are often better shared as a link with suitable access permissions.
- Use folders and search to keep messages findable. Check Sent, Trash and Spam when something appears to have vanished.
- Use the settings/preferences area for your signature and, where available, a vacation or out-of-office reply. Send yourself a message to check the result. Avoid publishing private travel details in an automatic reply.
Sign out after using webmail on a shared device. Closing a tab alone is not a reliable substitute.
Your favourite app is welcome
Webmail is ready in your browser. Prefer an app? These are the settings to keep handy.
| Setting | Incoming mail | Outgoing mail |
|---|---|---|
| Protocol | IMAP | SMTP |
| Server | mail.veryeasywebhosting.com |
mail.veryeasywebhosting.com |
| Port | 993 | 587 |
| Connection security | SSL/TLS | STARTTLS |
| Username | Your full email address | Your full email address |
| Password | That inbox’s password, or its app password when using Very Easy Sign-In | The same mailbox/app password |
| Authentication | Password | Required; use the same mailbox credentials |
If an app cannot use SMTP 587 with STARTTLS, the supported alternative is 465 with SSL/TLS. Keep the port and security type paired correctly.
Choose IMAP, rather than Exchange or POP. IMAP keeps the server’s folders in sync across devices. Deleting a message in one connected app can therefore delete it everywhere. For a separate archive, copy mail into a local archive and check that copy before deleting the server version.
Thunderbird on a computer
Thunderbird is a free option for Windows, macOS and Linux.
Add an existing email account, enter your name, full address and mailbox password, and choose manual configuration if the suggested settings differ from the table above. Set incoming to IMAP and check the outgoing SMTP settings too. Re-test the configuration and finish adding the account. Mozilla has a manual-configuration walkthrough.
Mail on iPhone or iPad
In the device’s Mail account settings, add another mail account if Very Easy Mail is not listed as a provider. Enter your name, email address, password and an account description. Choose IMAP, fill in both incoming and outgoing server details, and save. The outgoing username and password are required even if the app labels them optional. Check the ports and security against the table if sending fails. Apple’s account setup guide covers its current screens.
Other Android and desktop apps
Choose the app’s option for another account or manual IMAP setup, then use the table above. In the Gmail Android app, this is an additional non-Google mailbox; choose Other, then Personal (IMAP). Google’s manual account guide shows the steps. You can also use an Outlook app you already have where it supports manual IMAP setup. An Outlook app is different from the Outlook.com mailbox service.
You do not need to buy an office suite to read your mail. Browser webmail and Thunderbird give you free choices.
After adding any app, test sending and receiving. Then check that a message read on your phone also shows as read in webmail. A device’s local notification schedule may differ from when the server receives a message.
Make the shared storage work for you
Think of the plan as one cupboard with up to ten labelled shelves. You choose how much space each inbox can use.
The manager uses MiB for allocations, with up to 953 MiB across your account. Other customers on veryeasymail.com have separate allowances; they do not use yours. That is the interface’s whole-number allocation within the 1 GB plan. The default for a new inbox is 90 MiB; ten at that size allocate 900 MiB and leave some room to redistribute.
Allocated storage is an inbox’s ceiling. Used storage is what its messages currently occupy. An empty inbox allocated 90 MiB has not already received 90 MiB of mail, but that allocation still counts towards the domain’s allocation limit.
To give one inbox more space, reduce unused allocations elsewhere first. Do not set an inbox below the space it already uses. Sent messages, attachments and other stored folders count too. Keeping huge attachments in Sent and Inbox uses more room than keeping one copy.
To free space, save important files or messages elsewhere, remove what you no longer need and empty the relevant Trash folder when you are sure. Moving a message into another folder on the same server does not free server space.
Change an inbox, its password or its status
Choose Manage beside the inbox in your list, or select Update an inbox in the form. Check the mailbox name before making changes.
- Change Display name to update the friendly sender name. It does not rename the email address.
- Change Storage in MiB to adjust its allocation within the shared total.
- Enter a New password to replace that inbox’s password. Leave the field blank to keep the current one.
- Clear Mailbox enabled to pause that inbox, then Save mailbox. Re-enable it when it should be usable again. Mail sent while it is disabled may be rejected; pausing is not a holding queue.
After changing a password, update it in every app using the inbox. Old saved passwords can keep producing login errors in the background.
Delete an inbox
Export anything you need first. Choose Delete an inbox, enter the mailbox name and type its full email address in the confirmation field. Read the deletion message, then choose Delete this mailbox only when you intend to remove it and its messages.
Use a pause when you want a temporary stop. Use deletion when the mailbox really is finished. Backups are not a customer-facing Undo button.
Billing, renewal and leaving neatly
Open your customer-management page and choose Manage billing and renewal. The secure Stripe portal provides your available invoice, payment-method and renewal controls. Check the final confirmation after updating a card or cancelling renewal.
The plan is billed annually. If automatic renewal is enabled, keep the payment method current. Cancelling renewal stops a future renewal; access continues until the paid-through date shown for the service.
The service’s expiry timetable is:
| When | What happens |
|---|---|
| 6 weeks before the paid term ends | First reminder |
| 4 weeks before | Another reminder |
| 2 weeks before | Another reminder |
| 3 days before | Last reminder before expiry |
| At the end of an unpaid term | Service pauses |
| After 5 paused days | Final warning is sent |
| 10 days after that final warning | Live service data is deleted if the service remains unpaid |
Do not rely on paused mailboxes receiving reminders. Keep the external contact address working and check its spam folder. If that address needs changing, contact support; changing a billing email alone should not be assumed to update the service contact.
Renew before expiry for uninterrupted service. If paused, use the billing control and check the service status after payment. Mail rejected while a service is paused does not automatically appear later; the sender may need to resend it.
Before leaving, export messages, contacts and calendars, and arrange replacement mail routing. After live deletion, encrypted disaster-recovery copies may remain for up to 30 days; they are not available as an ordinary mailbox restore service. Deleted accounts must remain excluded when disaster recovery is performed.
Lost your management access?
Using @veryeasymail.com?
- Open Mail setup and choose the @veryeasymail.com option.
- Expand Already have an address? Recover account access.
- Enter one of your allocated email names, without @veryeasymail.com, and the existing external contact address confirmed at signup.
- Complete the security check and choose Send my recovery code.
- Enter the six-digit code from that external inbox and choose Restore my access within 15 minutes.
Use the newest recovery code if you requested more than one. You do not add DNS records for shared-domain recovery. Keep the external contact address accessible; a new, unverified address cannot claim the account.
Using your own domain? You can recover management access by proving you still control that domain. This does not change mail routing or delete email.
- Open Mail setup.
- Expand Already have a service? Recover account access.
- Enter your domain and choose Start recovery.
- Add the new TXT record displayed in your DNS. The recovery name uses
_very-easy-mail-recoveryunder your domain. Copy the current name and value exactly. - Return and choose Recover my account within the displayed 15-minute window.
- When recovery succeeds, remove that temporary recovery record and keep access on a trusted device.
If it expires, start again and use the new value. Do not keep starting recovery while waiting for one record to appear: each attempt’s instructions must match the record you are checking.
This restores the service manager, not knowledge of an existing mailbox password. The manager can set a new mailbox password when someone forgets theirs.
Something wobbling? Start here
First open webmail. If the mailbox works there but not in an app, focus on that app’s account settings. If webmail also fails, check the mailbox’s enabled status, service status and password. This small test saves a surprising amount of button-poking.
The security check is missing or will not finish
Open the full Mail setup link rather than an old bookmark. A page saying it is not here is a wrong-address problem, rather than a failed security check.
If the setup form appears, wait for the check to finish. Use Retry security check if shown. Check that JavaScript is enabled and that a browser extension is not blocking challenges.cloudflare.com. Try a normal updated browser tab; keep privacy extensions switched on for other sites. If it still fails, send support the time, browser and the exact message. You should not have to disable connection security or use the owner’s VPN.
My preferred @veryeasymail.com name is unavailable
Try a different available name. Existing, reserved and retired names cannot be claimed. Do not pay for a different address expecting support to rename it afterwards. Check the full address before checkout.
My confirmation or recovery code has not arrived
Check the external contact address you entered and its Junk folder. A code goes to that existing inbox, not to an inbox you have not created yet. Use the newest request and allow a moment for delivery; repeated requests can hit a temporary limit. An expired code needs a fresh request. Never post the code in a support message.
Very Easy Sign-In works, but this mailbox does not open
Check which identity you chose, particularly if Google shows several accounts. Use the identity actually connected to the mailbox. An unlinked mailbox still uses its ordinary mailbox login. If webmail works through Sign-In but a phone app fails, check that the app uses an app password, its full email address and the correct ports.
Domain verification cannot find my TXT record
Check that you edited the active DNS provider for the domain, not an unused DNS page at an old registrar. Compare the saved name and value with the current setup instructions. Look for a duplicated domain suffix, a record at @ instead of the requested name, or an old challenge value. Allow DNS caches to catch up after fixing it.
I paid but cannot create inboxes
Return to the original setup and choose Check order status. Keep the same domain and avoid purchasing twice. If you used another browser, use account recovery rather than starting a second service. Give support your domain, receipt reference and payment time if the order remains stuck.
The password is rejected, or I see 535
Use the full mailbox address, not just hello. Confirm that the inbox is enabled and the service is within its paid term. Check the password in webmail. If needed, the service manager can set a new one. Then update every connected app and check SMTP authentication as well as IMAP. Do not send your password to support.
I can send, but nobody can email me
Check the domain’s MX records, that the exact destination inbox exists and is enabled, and that it has space. Ask the sender for the full bounce message. If you recently moved providers, also check the old inbox while DNS caches expire. Creating hello@ does not catch mail sent to every other name.
I receive mail, but my app cannot send
Check outgoing SMTP: mail.veryeasywebhosting.com, port 587, STARTTLS, authentication on, full address and mailbox password. A working incoming connection does not prove outgoing settings are correct. Try sending from webmail to separate an app problem from a delivery problem.
One recipient rejects a message
Keep the bounce with its exact error and timestamp. It often names the cause:
| Example code or wording | What to check |
|---|---|
| 550 / 5.1.1 / unknown recipient | Spelling and whether that address exists |
| 552 / 5.2.2 / mailbox full | Space at the destination or in the affected mailbox |
| 535 / authentication failed | Mailbox credentials and app authentication settings |
| 550 / 5.7.1 | Read the full accompanying reason; it can concern authentication, policy or reputation |
| S3150 / sending network on a block list | Give support the complete rejection; changing your password will not remove a recipient provider’s network block |
Those codes are clues, not a complete diagnosis on their own. Do not repeatedly resend the same message to try to push through a rejection.
My messages go to Spam
Check the domain’s SPF, DKIM and DMARC records, and use a clear sender name and useful subject. Avoid large unsolicited batches. Recipients can correct their own spam classification for legitimate messages, but that alone does not prove a wider delivery issue is fixed. Give support a redacted example with its full headers if several recipients report the same problem.
My storage is full
Check used space, not just allocated space. Look for large attachments in both Inbox and Sent, and messages still in Trash. Save anything important before removing it. If another inbox has spare allocation, the service manager may redistribute it. Moving mail between server folders does not shrink it.
Messages have vanished or appear twice
Search all folders in webmail and check Trash and Spam. IMAP mirrors changes from other devices, including deletions. For duplicates, check whether the app and server are both saving sent copies to different folders. Do not delete the account from your app or clear its local data before checking whether it holds your only copy of anything.
A certificate or security warning appears
Check the server name against the settings table and ensure the device’s clock is correct. Do not bypass a certificate warning or switch encryption off to make the error disappear. Contact support with the warning text and app version.
An admin link fails, or someone mentioned a VPN
For your messages, use customer webmail. For your service, use Mail setup. Customer access does not require the server owner’s VPN or administration pages.
Keep your inbox yours
Use unique passwords and keep your apps and devices updated. Check unexpected payment or password-reset requests by opening the known service address yourself. A familiar display name is not proof of who sent a message.
Never send support your mailbox password, card number, one-time code, recovery TXT value or a private management/billing link. If you think a password has leaked, have the service manager replace it and update the legitimate devices. Contact support about suspicious access rather than assuming a local sign-out removes every session.
Need a human? Bring the useful bits
Contact Very Easy Web Hosting through the website’s contact section. Include:
- The affected email address, and your domain if you brought your own.
- What you tried, what you expected and what happened instead.
- The time, date and time zone.
- Whether webmail works, and which app/device has the problem.
- The exact error or a screenshot with private content hidden.
- A receipt reference if the issue is payment or setup.
Our small price covers a service designed for self-service, backed by these guides and email help. Replies can take a couple of business days; there is no staffed 24-hour emergency desk. If an email is business-critical, keep your own exports and a practical fallback contact method.
We work to keep mail dependable, but do not promise uninterrupted service or delivery to every recipient. The Mail service terms explain the support and availability arrangements.
Leave passwords, codes, payment details and private access links out. Useful details get us to the answer faster. A screenshot of a mysterious red box is good; the words inside that box are even better.
Tiny glossary, no exam afterwards
IMAP: keeps your mail folders synchronised between the server and apps. SMTP: sends messages. MX: tells the internet where your domain receives mail. TXT: a DNS record type used for verification and other text instructions. SPF: identifies authorised senders. DKIM: lets receiving systems check a message’s signature. DMARC: supplies the domain’s authentication policy. TLS: encrypts a connection. Quota: the maximum storage allocated to an inbox.
Your all-done checklist
- Your inbox appears as enabled in management.
- Mail to an outside address arrives, and its reply reaches your inbox.
- Your preferred app sends, receives and synchronises as expected.
- Your contact address remains reachable outside this service.
- You know where billing lives and when the paid term ends.
- Your passwords and any exports are stored safely.
You’re ready to put a name to your inbox. Your domain or ours: go on, send that first hello.